Template Formatting Guide
Learn how to format your Word, Excel, and PowerPoint documents with our simple tagging system to unlock powerful automated document generation.
Basic Variables
The core of our templating engine relies on simple text replacement. By enclosing your column names in double curly braces, the engine knows exactly where to inject your data.
For example, typing {{FirstName}} in your document will directly match and replace with the data from the FirstName column in your spreadsheet.
Tip: Tags are case-sensitive. Ensure your document tags match your column headers exactly!
Dynamic Tables
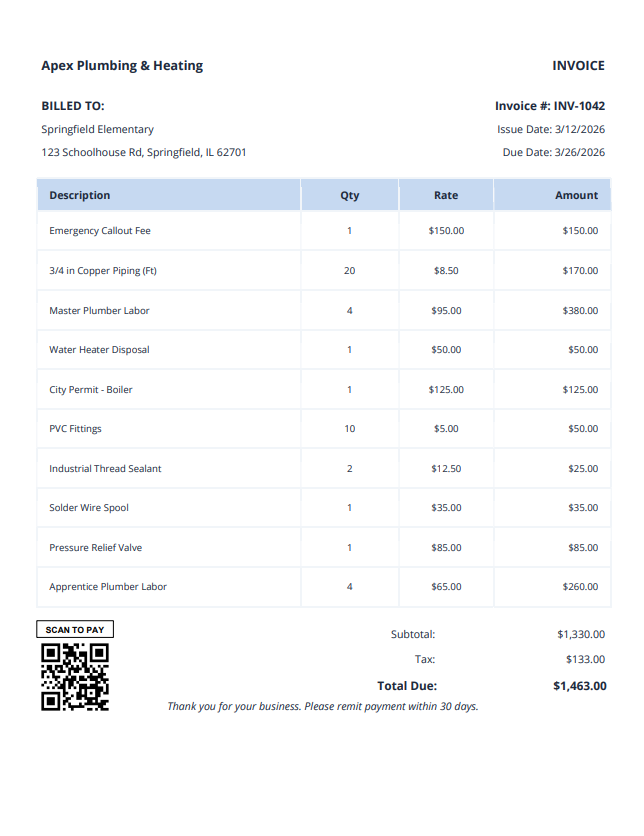
Generating itemized lists—like an invoice with multiple line items—is incredibly simple using our grouping and cell prefixes.
- Grouping Documents: Prefix a column header with
UID_(e.g., UID_Invoice Number) to group multiple rows of data into a single document. - Duplicating Rows: Inside a Word or Excel table, use the
CELL_prefix (e.g.,{{CELL_ItemName}}) to tell the engine to automatically duplicate the row for all matching grouped data.
The First-Row Rule
When you use a UID_ to group data, what happens to the standard tags (like {{CustomerName}}) that don't have a CELL_ prefix? The engine will automatically pull the data for those standard tags from the first row of that specific group. Ensure the static data is correct in the first row of any grouped item!
Example: Automated Invoice Generation
Template (With Tags)
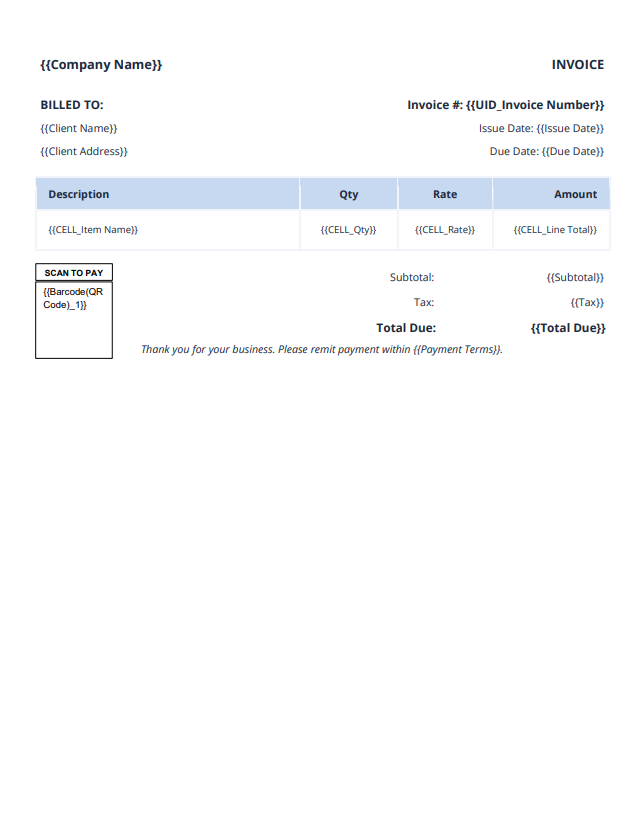
Generated Result
Images & Media
You can dynamically inject images into your templates. The engine supports both local file uploads during generation and remote URLs from your data.
{{Image(ColumnName)}}: Used for injecting locally uploaded images. The value in your ColumnName should match the filename you upload alongside your data.{{Image(URL_ColumnName)}}: Used for injecting images from the web. The value in your URL_ColumnName must be a direct, publicly accessible link to an image (e.g., ending in .jpg or .png).
Barcodes
Easily generate scannable 1D and 2D barcodes based on your dynamic data. We support a variety of standard formats.
Examples of valid syntax:
{{Barcode(QRCode_PaymentLink)}}{{Barcode(Code128_TrackingNumber)}}
Replace PaymentLink or TrackingNumber with the exact name of your data column.
Excel & PowerPoint Rules
The "Alt-Text" Requirement for XLSX & PPTX
Unlike Microsoft Word, Excel (.xlsx) and PowerPoint (.pptx) do not support typing images directly inline with text. To inject dynamic images or barcodes into these file formats, you must use the Alt-Text Workaround.
How to do it:
- Insert a "dummy" placeholder picture into your Excel sheet or PowerPoint slide where you want the final image to appear.
- Right-click the picture and select "View Alt Text..." (or "Edit Alt Text").
- In the description box that appears, paste your exact tag (e.g.,
{{Image(URL_Photo)}}).
The engine will automatically find this picture and replace it with your dynamic media, perfectly matching the original dimensions and placement of your dummy placeholder.
API & Zapier Integration
BatchExport isn't just a manual dashboard. You can fully automate your document generation pipelines by integrating our REST API directly into mainstream automation tools like Zapier, Make (Integromat), or your own custom backend.
Zapier Integration (Official App)
You can effortlessly automate your document generation pipelines using our official Zapier app. Connect BatchExport with thousands of other apps to build custom workflows without writing any code.
The CSV-to-JSON Helper Snippet
Zapier's default CSV parsing often flattens data, making it difficult to pass structured arrays. To solve this, use a Code by Zapier (Run Javascript) step to format your spreadsheet data properly before sending it to BatchExport.
Copy and paste this exact snippet into your Javascript step:
// Grab the raw CSV text
const rawText = inputData.csvText.trim();
const lines = rawText.split(/\r?\n/);

// Regex safely splits by commas EXCEPT when they are inside quotes
const csvSplitter = /,(?=(?:(?:[^"]*")2)*[^"]*$)/;
const cleanQuotes = (str) => str ? str.replace(/(^"|"$)/g, '').trim() : "";

const headers = lines[0].split(csvSplitter).map(cleanQuotes);
const jsonArray = [];

for (let i = 1; i < lines.length; i++) {
  if (!lines[i].trim()) continue;

  const values = lines[i].split(csvSplitter).map(cleanQuotes);
  let rowObject = {};

  headers.forEach((header, index) => {
    rowObject[header] = values[index] || "";
  });

  jsonArray.push(rowObject);
}

return { json_payload: JSON.stringify(jsonArray) };
API endpoints & Examples
The primary endpoint for generating documents is https://api.batchexport.com/generate.
This endpoint strictly requires a multipart/form-data request containing the following fields:
- template_url (or template_file): The direct download link to your .docx, .xlsx, or .pptx template.
- batch_data: A stringified JSON array of your row data.
- base_filename: The desired name for your output zip archive and files.
Example cURL Request:
curl --location 'https://api.batchexport.com/generate' \
--header 'Authorization: Bearer YOUR_API_KEY' \
--form 'template_url="https://drive.google.com/uc?export=download&id=YOUR_FILE_ID"' \
--form 'base_filename="Invoice_Batch"' \
--form 'batch_data="[{\"FirstName\": \"Jane\", \"LastName\": \"Doe\"}]"'
You can manage your API keys and view your usage limits from the Developer Settings tab.